Showing posts with label hair. Show all posts

Wednesday, September 18, 2013

Una semana de inspiración: Día 3 Tips para una boda y lo que aprendí de mis fracasos


¡Hola! Esta semana vamos a tener un post diferente cada día sobre las cosas que nos inspiran o que nos gustan y pueden inspirar a quien pase por nuestro blog :3 

Hey! This week is inspiration week, we'll be posting everyday something that inspires us or that we like and think may inspire you :3 

Hace algunas semanas fui a la hermosa boda de la hermosa prima de mi novio. Estuvo muy bonita y todas las invitadas - casi - usaron vestido largo menos yo. Obviamente no me vestí de acuerdo a la etiqueta (juro que no sabía y además soy una inexperta en bodas), y aunque no recomiendo eso, si recomiendo algunas cosas:

A few weeks ago I went to the beautiful wedding of my boyfriend's beautiful cousin. It was lovely and everyone wore a long dress -almost - except me.... I obviously didn't dress according to the dress code (I swear no one told me and I'm a wedding newbie), and I don't recommend that, but here are the things I do recommend you take!


1. Si quieres peinarte como nunca te has peinado o hacerlo tu solita, por amor de dios ¡PRACTICA! Yo pensé que iba a ser super fácil porque no tengo el pelo muy largo y no quería nada complicado, pero fue horrible, lo arruiné todo. Fracaso número dos. Logré arreglarlo un poco con ayuda y esconder lo peor con pasadores, pero en retrospectiva ojalá hubiera practicado más (sólo practiqué una vez), o pedido ayuda, o hubiera ido a un salón.

1. If you want to try a new hairstyle or style your hair on your own, PRACTICE! I thought it was simple, my hair isn't even that long, but man, I messed it up! I practiced only once because it took me forever to decide on a curling wand, and the first time was perfection, and on the actual day total chaos. I managed to tame it a bit and hide it with bobby pins but I wished I'd practiced more, asked for help or went to the hairdresser's.

2. Si es probable que te inviten a alguna boda o evento en el próximo año y no tienes mucho dinero o no quieres repetir vestidos, compra un vestido cuando estén las baratas, o en algún bazar y arreglalo. (Recuerden preguntar la etiqueta si ya conocen el evento) Este vestido me costó $250 pesos en Sfera y $90 pesos arreglarlo y ahora me queda perfecto, encontré mis zapatos en oferta pero recomiendo gastar más en zapatos y una bolsa que puedan combinar con varios de tus vestidos (¡mi bolsa costó más que el vestido y combina con todo lo que tengo y tiene una cadena para colgarla!).

2. If you are likely to be invited to an event in the upcoming year and you're on a budget, or you don't want to wear the same thing over and over again, I recommend buying a dress during sale season or in a thrift shop and altering it. This dress was $20 dollars, and I spent less than $10 altering the top half to fit me perfectly and that way I could spend a little more on some shoes and a bag that looks good with a lot of things I own. (Remember asking for the appropriate attire etiquette beforehand!)

3. Quería usar una bolsa tipo clutch así que no podía llevar muchas cosas, esto es lo que llevé:

-Lipstick (Clinique's Heftiest Hibiscus)
-Polvo/Powder (Rimmel's Stay Matte)
- Brocha retráctil, Retractible Brush
- Pasadores / Bobby Pins
- Celular / Cellphone
- IFE y dinero / I.D. Money
- Kleenex
- Aspirinas

3. It was very important for me to wear a clutch, so taking very few things was paramount, this was what I took:

Así es como me veía el mero día, estoy afuera de la iglesia.
This was how I looked, I'm outside the church.

Tal vez a alguien que tampoco tenga mucha experiencia en bodas encuentre estos tips útiles, ojalá tengan muy bonito día :) 
Maybe someone with little wedding guest experience can relate and find some of these tips helpful, have a lovely day!
-S


Wednesday, August 14, 2013

Makeup Starter Kit - Kit Básico de Maquillaje


A make-up starter kit is a list of make-up recommendations for people who want to start wearing makeup or want to expand their collection and don't know what basics they're missing. 


I wrote a super long intro - which you don't have to read :p - sharing a little of my make up story. 


Un kit básico de maquillaje es una lista de recomendaciones para quien quiera empezar a usar maquillaje o quiere ampliar su colección pero no sabe por donde empezar o que cosas básicas les hacen falta. Escribí una introducción super larga pero pueden saltarsela :p contando un poco de mi historia y como empece a usar maquillaje. 


My interest in make-up arose a couple of years ago, but maybe even before that, because I always had looks I recognized as favorites in movies (Audrey Hepburn in Breakfast at Tiffany's of course, Amanda Seyfried with her perfect natural look in Letters to Juliet,  Marie Antoinette...), but I didn't wear ANY make-up. I was literally one of those girls who are afraid of wearing mascara let alone lipstick. I was petrified of anyone noticing and asking 'are you wearing eyeshadow!?' I don't even know why I cared really, I had blue hair and dressed like a crazy emo ... or something, haha but I did care.

But now I am all about make-up, it goes hand in hand with my fashion obsession - which I was confident to share from an earlier age - and my photography interest.
And even though I've had a very slow start, and I still don't go out with full-on super dramatic looks, but I know my stuff, I try new things, I have books, I have been collecting and using make-up for a couple of years, and I've watched hundred of makeup tutorials on youtube. I have a more in depth look into movies and magazines than I did before and I experiment with various things.
I think one of the main reasons I didn't want to wear makeup is because I didn't know anything about it and everytime I could recognize makeup I saw it on terrible obvious cakey applications or worse, but now that I know the difference between products and their versatility phew.... :3 I hope I can inspire someone else to look at it differently.

Mi interés por el maquillaje se intensificó hace un para de años, pero supongo que siempre me llamó un poco la atención porque recuerdo varias películas y looks que reconocía como favoritos (Como Audrey Hepburn en Breakfast at Tiffany's, Amanda Seyfried con su sombra super natural en Cartas a Julieta, Maria Antionieta...), pero yo no usaba n a d a de maquillaje. Era, literalmente, una de esas niñas que tenía miedo de usar mascara (o rimmel como le decía en aquella época :p), deja tú un labial. Me daba muchísimo miedo ponerme sombras y que alguien me fuera a preguntar ¡¿Estas usando sombras en los ojos?! No sé bien porque me importaba, sinceramente porque tampoco es que quisiera pasar desapercibida, en esa época tenía el pelo azul y me vestía como una especie de emo loca...o algo así, jaja.
Ahora en cambio me encanta todo lo que tiene que ver con el maquillaje y creo que combina muy bien con mis demás intereses, la fotografía y la moda (curiosamente la moda es un interés que tengo desde hace muchísimo y no me daba pena decirlo).  Y aunque he tenido un comienzo bastante lento y no salgo con maquillaje super dramático a la calle ni nada, sé bastante más  y me gusta probar cosas nuevas. Tengo varios libros que me gustan mucho, tengo una creciente colección de maquillaje y he visto cientos de tutoriales en youtube. 
Tenía una idea muy equivocada de lo que consistía el maquillaje y me gusta experimentar, porque una de las razones principales por las que yo no me maquillaba es porque no entendía nada al respecto y cuando podía identificarlo era porque era horrible y veía mujeres en la calle usar maquillaje muy notorio, mal aplicado y con un acabado espantoso como de máscara descarapelada con manchas naranjas en los cachetes. Ahora que conozco la sutileza que puede tener y la versatilidad de los productos ¡fiuff! :3 Espero yo poder hacer cambiar a alguien de opinión.

Anyway, the thing is, I would've LOVED to find a make-up starter kit post or video when I most needed it, so I hope this is helpful! 
Feel free to skip around and read only the categories you are interested in ;)


****All the products I recommend are drugstore bought or cheaper alternatives to high-end makeup. Not everyone is ready to spend a lot in one MAC or Chanel product without trying around a couple of things first !

En fin, el punto es que hubiera AMADO leer un post de un kit básico de maquillaje o un video cuando lo necesitaba espero que esto sea útil para alguien.
Sientanse con la libertad de saltarse a los productos que les interesen ;)

**** Todos los productos que recomiendo son del super o alternativas buenas y baratas. Porque sé que no todos quieren empezar pagando por algo carísimo de MAC o Chanel sin probar un par de cosas antes. 

___________________________________________________________________________

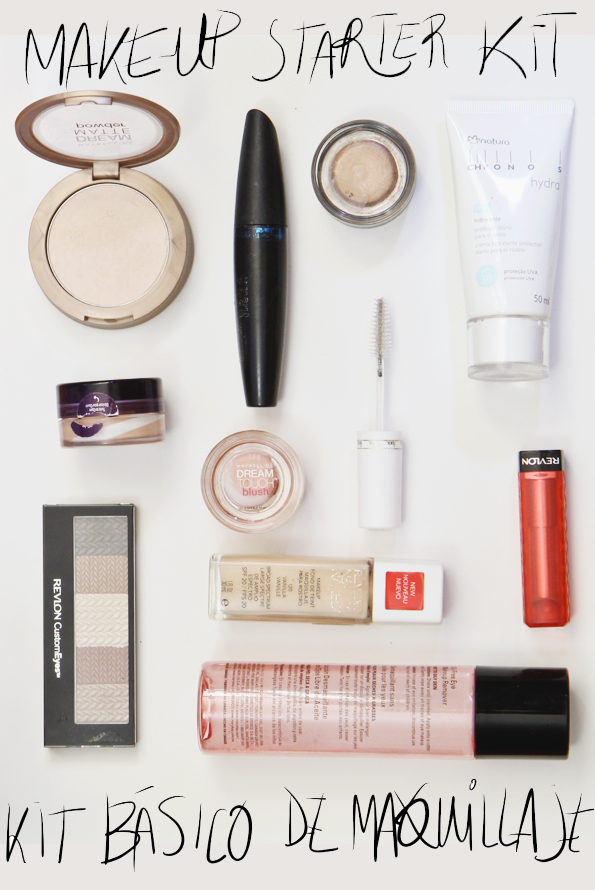
1 MOISTURIZER Everyone needs moisturizer normal, dry, combination or oily skin (I am combination), everyone. And it helps the foundation look more natural! I use a Natura moisturizer with SPF30 (very important!), but I also like Aveeno and Neutrogena mositurizers.

1 CREMA HIDRATANTE Todos necesitan usar crema, no importa si tienes la piel seca, grasosa o combinada, todooooss. Y ayuda mucho a que todo lo demás que pongas encima se vea más natural.
Yo uso la crema Hydra de Natura porque tiene protección solar FPS30 y eso me parece muy importante, pero también me gustan las de Aveeno y de Neutrogena. 


2 FOUNDATION There are a lot of options, matte, full on, tinted moisturizers, bb and cc creams blablabla, but if you want to give a real foundation a try I recommend Revlon's Nearly Naked, it has quite a few colors in the range and it leaves a natural finish but it is buildable, once you blend the first layer you can put a little more in the places where you need it most. I buff it in with a brush but you can use your hands and works just fine.

2 BASE Hay muchísimas opciones, mate, cubriente, ligera, BB y CC pfftt.... pero bueno eso es un post aparte, si quieren probar una base normal que cubre bien pero no es muy pesada y se ve muy natural les recomiendo la Revlon Nearly Naked tiene varios colores en la línea y es muy fácil de aplicar con las manos, yo uso una brocha pero queda bien de las dos formas.

3 CONCEALER Not everyone needs concealer. Concealer works for blemishes, scars and dark circles. And then again maybe you have really good skin and you don't need foundation and you can use a little concealer in strategic places and look flawless. I recommend Cover Girl - Olay's concearler it has a swirl of moisturizer in the middle so it's not too drying.
I also recommend trying out a highlighting concealer to use under your eyes to cover dark circles. 


3 CORRECTOR Es curioso porque en inglés hay corrector y concealer y en español no estoy segura si le dicen así, pero en fin, me refiero a un producto cubriente del mismo color de tu piel que sirve para cubrir granitos, manchas y demás detalles. No todo mundo lo necesita o a veces con un poquito de corrector y nada más puedes quedar perfecta y saltarte la base. La piel de todos es diferente. Yo recomiendo el corrector de Cover Girl- Olay que viene en este frasquito morado y transparente y tiene un espiral blanco (es crema hidratante en el centro y se supone que ayuda a que no se vea seco y pastoso). 
También recomiendo usar un corrector iluminador para abajo de los ojos, y cubrir las ojeras. Les recomiendo el corrector iluminador de natura.


4 POWDER Most days I don't use any powder, but it is great if you have a shiny face, it helps to mattify everything and set it so it lasts longer. I have the Maybelline Dream Matte Powder but I also recommend the Rimmel Stay Matte powder, it's cheaper and better ;)
I always apply it with a brush.

4 POLVO La mayoría de los días no uso polvo pero es ideal si tu piel brilla y quieres matificarla o quieres que tu maquillaje dure más. Yo tengo el Maybelline Dream Matte Powder pero recomiendo también el Stay Matte de Rimmel, es más barato y mejor ;)
Siempre lo aplico con una brocha.

5 EYESHADOW  


-Cream I love cream eyeshadows they are super mega easy to apply - I applied mine with one finger and blended with another at the edges  (you can see in the pic the right one is blended and the left one not yet )- I love the Maybelline Color Tattoos, this one is a bronze color. Cream eyeshadows look great on their on (with some mascara you've got an excellent everyday look!), but they also set so if you put powder on top it lasts longer!


-Powder A trio, quad or tiny palette is the way to go! You have a few options to change it up whenever you want. A few I recommend are the Revlon Custom Eyes palettes  ,they look really cute with their woven thingies and they are really good, they come in a bunch of colors. . This one is in 020 naturally glamorous, I went really neutral to show you an easy everyday option but there are some colorful options in the range.
You can use any of the colors all over the lid and blend the edges (you can do it with your fingers but to be honest having brushes makes everything better looking and easier) or do what I did (on top of the cream eyeshadow) and apply a light color in the center of the lid, a medium one in the outer part of the lid and below my bottom lashes and the darkest at the root of the lashes instead of using a pencil to line the top lashes ;)

5 SOMBRAS 

-Crema  Me encantan las sombras en crema, son mis sombras favoritas. Son super faciles de aplicar - yo aplique la que tengo en la foto con un dedo y difuminé la orilla con otro (se puede ver como el lado derecho ya lo difuminé y el izquierdo no),  recomiendo muchísimo los Maybelline Color Tattoos, el que estoy usando es color bronce. Las sombras en crema se ven muy bien solas (con tantita máscara es ideal para usarla durante el día y nada más), pero también se asientan entonces sirven muy bien si pones sombra en polvo encima y duran mucho más.

-Polvo ¡Un trio, cuarteto o una paleta pequeñita es la mejor opción! Tienes varias opciones para no aburrirte e intentar varias cosas juntas o separadas. Algunas de las que recomiendo son las Revlon Custom Eyes palettes, que tienen cuatro colores (están en la foto) y se ven preciosas con su patroncito como de tejido, y funcionan muy bien, vienen en varios colores. Esta es la númer 020 "naturally glamorous" y la escogí porque es muy neutral y buena para uso diario pero también hay disponibles unas más coloridas. 
Puedes usar cualquiera de los colores por todo el parpado y difuminar las orillas (se puede hacer con los dedos, pero para ser sincera usar brochas hace que todo sea más fácil y se vea mejor), o hacer lo que yo hice encima de mi sombra en crema, aplique un color claro en el centro del parpado, uno medio en la parte exterior y abajo del ojo y use el color más oscuro pegado a las pestañas de arriba en lugar de usar un delineador :) 

Otras recomendaciones serían las sombras de Cover Girl en Golden Sunset o en Shimmering Sands. 


For some other neutral options, I also recommend the wet n' wild palettes, they are super cheap and nice to use, very soft and pigmented. Or the covergirl trio (quads?) in Shimmering Sands or Golden Sunset.
And if you are an eyeliner person you can use a pencil of course, but I personally love and prefer gel eyeliners, they are versatile and easier to use than a liquid one. This one is the Maybelline Lasting Drama (or Eyestudio) gel eyeliner, they have it in various colors.

Si te gusta usar delineador puedes usar un lápiz por supuesto, pero a mi me encantan y tal vez prefiero, los delineadores en gel, son muy versátiles y más faciles de usar que los líquidos. El que esta en la foto de abajo es el Maybelline Eyestudio gel liner. Hay en varios colores


6 EYEBROWS I love defining my eyebrows it makes such a big difference! Unless you have really full eyebrows I think a little filling in wherever you have sparseness and helping the shape a little bit can do wonders. You can use a matte brown eyeshadow or a hard pencil (maybelline do an eyebrow pencil with a brush at the end). Always go a tiny bit lighter than your natural color and never use a red toned pencil (brown red, orange, etc), not even if you are a redhead :3
I use a clear mascara to keep my eyebrow hairs in place!

6 CEJAS  Me gusta mucho definir las cejas, siento que hace mucha diferencia. A menos de que tengas cejas muy tupidas llenar un poco los huequitos y ayudar un poquito la forma mejora mucho las cosas. Puedes usar una sombra café mate o un lápiz para cejas (maybelline hace uno con un cepillito en la tapa). Siempre usa un tono más claro que tu color natural y nunca uses uno rojizo (marrones rojizos, naranjas, etc), ni siquiera si eres pelirroja :3
Yo uso máscara de pestañas transparente (de $18 pesos) para mantener mi cejas peinadas.

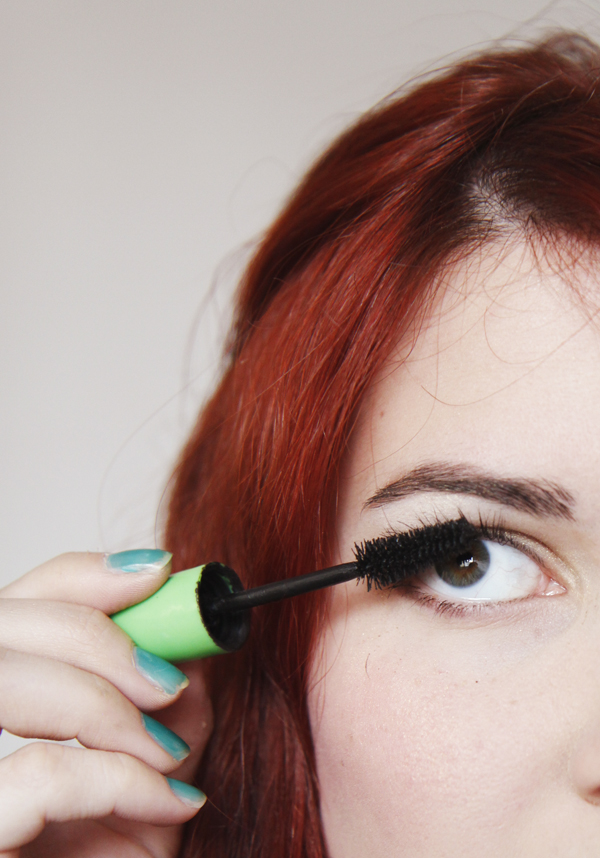
7 MASCARA is very important to look a little made up, and if you don't have anything else on you look a little better, but you don't look made up. I personally don't like clumpy or spiky lashes, but I have long and curly eyelashes anyway (which I like, but my eyebrows are like that too which I don't like :p). I like the Max Factor False Lash Effect and Maybelline the Falsies (I didn't at first but now I do), and I wear the waterproof versions, they are a pain to remove but last without staining below my eyes.

7MASCARA Es muy importante para verte arreglada o un poco mejor. Puedes no usar nada más y sólo con ella te ves mucho mejor. Personalmente odio las pestañas con grumos o todas pegadas, me gusta más cuando están separadas. Las mías son bastante largas y chinas (eso es bueno), pero también son así mis cejas (eso es malo :p). Me gusta la Max Factor False Lash Effect y Maybelline the Falsies  - que al principio no me gustaba pero ahora me gusta mucho - y normalmente uso a prueba de agua dura mucho y no mancha abajo de los ojos, pero es una moncerga de quitar. 


8 BLUSH I guess I am a cream product lover, because I also love cream blushes, but let me just say, powder blush it better with a brush, but cream is just so easy! Apply and blend with your fingers, it leaves a natural dewy effect which I love! This is the Maybelline Dream Touch Blush.

8 BLUSH Supongo que me gustan mucho los productos en crema en general, porque también me encantan los blushes. ¡Es tan facil! Los aplico y lo difumino con los dedos. Se ve muy natural y te deja radiante y eso me gusta. Este es el Maybelline Dream Touch Blush.


 9 LIPSTICK I think lipstick scares a lot of people (me included, at first), and the Revlon Lip Butters are a great way to start, they are a lipstick and lip balm as well. In the picture I am wearing the color Cherry Tart, in the top pic I swiped it once, and as you can see it looks sheer, a little wash of color with a little shine, and in the bottom one I swiped it three times (it looks brighter in real life) and it looks more intense, but very comfortable to wear, very moisturizing.

9 LIPSTICK-LABIAL Creo que esta es una de las cosas que más asusta a la gente (yo incluida, al principio y los Lip Butters de Revlon son una buena manera de empezar a usar porque es como el punto medio entre un lipstick y un bálsamo. En la foto tengo puesto el color Cherry Tart, primero pasandolo una vez y en luego 3 veces (se ve más intenso en la vida real), y si tiene mucho color pero es agradable de usar y humecta los labios. 

10 MAKEUP REMOVER I had to include this because most people I know don't have a proper makeup remover even though they use makeup and it is SO important. Sleeping with makeup is terrible for your skin, your eyes, everything basically. I use an oil free bi-phase remover (Mary Kay pink one, in the picture at the top of the post) to remove my eye makeup, and a neutrogena yellow (orange?) soap for the rest of my face and use a face scrub once a week. I moisturize afterwards and use an eyecream at nights.  I do not recommend the Almay eye makeup remover pads by the way, I felt I was going to go blind after one use.

10 DESMAQUILLANTE Tenía que incluir esto porque muchísima gente que conozco no se retira el maquillaje ni se limpia por completo la cara y creo que es MUY importante. Dormir con maquillae es lo peor para tu piel y tus ojos... y todo básicamente. Yo uso uno sin aceites bi-fásico de Mary Kay (el famoso que viene en un bote rosa transparente, sale en la foto de hasta arriba del post) y luego me lavo la cara con el jabón amarillo (¿o es naranja?) de Neutrogena. Uso un exfoliante una vez a la semana y me pongo crema para cara y luego para ojos antes de dormir. No les recomiendo nada el de Almay porque lo use una vez y sentí que me iba a quedar ciega (son unas toallitas redondas que vienen ya con desmaquillante)


Haha you can see my hair drying through the process :p 

Jajjaa y pueden ver como se me seca el pelo durante el proceso :p

I hope you like this post! It took a long time to make because I really thought of what I thought it's a good place to start. Please let me know if you like it, if you have any recommendations, questions, etc.
Have a great weekend everyone! xoxo

Espero que les guste este post :) Me taré mucho en escribirlo porque me puse a pensar detenidamente que productos considero básicos. Por favor digame si les gusta, si tienen alguna recomendación o alguna pregunta.
¡Ojalá que tengan muy bonito día y resto de la semana!

-S

Saturday, July 6, 2013

Hairpieces: Julien D'Ys


I've been collecting fashion magazines for ten years (gulp! O_o), and I think I still enjoy reading them every month (and no, I haven't counted how much money I've spent in them, and yes people have asked me!), and one of my favorite things is finding some article written by a writer whose pieces I love, cause they don't always write - Plum Sykes and Jeffrey Steingarten I'm looking at you - or finding and editorial piece with a photographer I already love or a stylist I admire. And one of my absolute favorite things is finding a shoot where the model is wearing a Julien D'Ys hairpiece:

Colecciono revistas de moda desde hace más de diez años (O_o) y creo que sigo disfrutandolas cada mes (y no, no me he puesto a contar cuanto dinero he gastado en ellas, ni me interesa ¡pero me lo han preguntado!), y una de las cosas que más disftuto es ver una sección editorial con algún fotografo o  estilista que ya conozco y me gusta mucho o algún reportaje escrito por alguien que no siempre escribe y de pronto lo hace y es especial -Plum Sykes y Jeffrey Steingarten por ejemplo - . Y una de las cosas que más me gusta encontrar cuando leo Vogue es ver una pieza para la cabeza (no se como se dice en español jajaja), hecha por Julien D'Ys:


Here he is, photographed by Robert Fairer. I want to share some of my favorite pieces created by D'Ys. And lately I've been wanting to make - or getting Carmila to help me make - some hairpieces for a photoshoot
Aqui está Julien fotografiado por Robert Fairer. Les quiero compartir algunas de las creaciones de peinados/arte en la cabeza hechas por D'Ys (se pronuncia Diis), que son de mis favoritas. Desde hace tiempo quiero hacer - o más bien que Carmila me ayude a hacer - cosas para la cabeza y usarlas en una sesión de fotos


I hope you like them! some weekend inspiration :)
¡Ojalá les gusten! Un poquito de inspiración para este fin de semana (:
-S

Thursday, June 20, 2013


Fabrics and ribbons (the thing about ribbons is that I need to get some matte ones because I'm over the shiny ones, so I'm using a piece of fabric instead :)
I'm afraid this isn't a proper tutorial and I'm not showing anything new, but I watched a movie the other day and the girl always fixes her hair with a ribbon and I thought "how cool and effortless!" So I got inspired and thought I'd share some things I've been wearing with my piece of fabric as a ribbon - I got it from a dress I bought a couple of years ago and asked for the leftover fabric when the store fixed the hemline for me, so now I have a matching ribbon and dress - .

Telas y listones (lo que pasa con los listones es que no me gustan brillantes, así que en lo que me encuentro algunos mate, usaré una tela :)
Me temo que este no es un tutorial de verdad y no estoy enseñando nada muy nuevo, pero hace poco vi una película con una niña que siempre se amarra el pelo con un listón y pensé "que fácil y elegante y bonito" y me inspiró a probar un par de peinados usando este sobrante de tela como listón - lo conseguí cuando me compre un vestido y pedí que me subieran el dobladillo, les pedí que me guardaran el sobrante de la tela, así que ahora tengo un vestido que combina jaja) -.


The first is a simple top bun, but I really like it with a ribbon or piece of fabric wrapped around, I've worn it without a bow, just making a knot and letting the ends hang and I like it even more! 

The second one is the easiest and cutest, put the ribbon through a hairband and when you make a side ponytail with it, the ends of the ribbon should be hanging at the sides, I tied them around a couple of times.

And the last one looks awesome with something more flashy! (I want to get a sequined headband, I lost one that had metal thingies :'( I divided the front part of my hair in three parts, pinned the middle of the ribbon secure at the roots and braided the hair along with the ribbon. I regularly took pieces of hair from around my hairline, like a kind of half french braid, but nothing very precise, I like it messy. Once I got to the other side y pinned the end of the braid along with the ribbon behind my ear. Done! 

En la primera foto nada más me hice un chonguito alto, pero me gusta mucho como se ve con la tela amarrada alrededor. Ya lo he usado sin moño sólo con un nudo y dejando que cuelguen las orillas y ¡creo que me gustá más!

El segundo es el más facil y lindo, para hacerlo pasa el listón por en medio de una liga y cuando te hagas una colita de caballo (yo me la hice de lado) las orillas colgaran a los lados, yo les di un par de vueltas y lo amarré con un nudo.

Y el último se ve super bien si usas algo más llamativo (quiero una cosa para la cabeza con lentejuelas, tenía una con cositas de metal pero la perdí :'(  Lo que hice fue dividir en tres la parte de adelante del pelo y atorar con un pasador la parte de en medio del listón a la raiz del pelo agarrando el listón trencé agarrando pelo de arriba de mi frente (como una media trenza francesa, pero nada precisa, me gusta así dispareja), y cuando llegué al otro lado la atoré con un pasador detrás de la oreja. 

Have a lovely day!
¡Que tengan muy bonito día!
-S


Tuesday, May 28, 2013


Braid bun tutorial

This super easy tutorial was Vanessa's idea. Vanessa is the Ponycat's little sister if you don't know her, she has lovely hair, perfect for tutorials! Here are the steps (:

Este tutorial super sencillo fue idea de Vanessa, que es la hermana pequeña de las ponycats, por si no la conocen. Su pelo es hermoso y es perfecto para tutoriales ;) Aquí están los pasos:


1) Have a couple of hairpins and teeny tiny plastic hairbands ready
2) Use one small plastic hairband (we didn't have any but their are easier to hide!) and make a ponytail with a section of hair, we braided a small section above the ponytail it to make it look cuter, but that's entirely optional 
3) Braid the ponytail and secure the ends with another rubberband
4) Wrap the entire braid around the beginning of the ponytail making a spiral, forming a bun. Secure it with a hairpin.
5) Repeat the last three steps on the other side.
6) Done! You have a lovely half up-do, you can complete it to a full up-do if you continue to grab the rest of the hair in another braid.

1) Vas a necesitar pasadores y ligas pequeñitas de plástico
2) Haz una colita de caballo y amarrala con una liguita (nosotros no teníamos de plástico, pero las recomendamos porque son más faciles de esconder), en este caso trenzamos un poquito en la parte de arriba antes de hacer la colita para que se viera bonito pero eso es opcional.
3) Trenza la colita de caballo hasta las puntas y asegurala con otra liga.
4) Envuelve la trenza alrededor de donde empieza la colita de caballo haciendo un espiral hasta que llegues a las puntas. Se debe formar un chonguito, aseguralo con pasadores.
5) Repite los últimos 3 pasos del otro lado 
6)¡Listo! Así te queda con pelo suelto abajo, pero puedes recoger el resto del pelo en otra colita y hacer otro chongo como en las fotos de abajo.

I love the half up look but if you want to make it a little more elegant you can make a third bun (or as many buns as you like for that matter!), and place it below like we did or leave a little more space and line them up.
 A mi me encanta como se ve con la mitad abajo pero si quieres recogerlo todo y que se vea más elegante puedes hacer una trenza más y acomodar el siguiente chonguito más abajo, o dejar más espacio entre los dos primeros y colocarlos en línea. 


This hairstyle is super quick and simple, it looks a lot more complicated that it actually is. I hope you like it!
Este peinado es super rápido y fácil y se ve mucho más complicado de lo que es. ¡Espero que les guste!

Have a great week!
¡Que tengan bonita semana!
-S


Friday, May 10, 2013

Dos tutoriales de trenzas:

¡Hola! Traemos un nuevo video desde nuestro canal de Ponycat en Youtube. Son dos tutoriales de peinado, los dos con distintas versiones de trenzas francesas. En este video salimos las dos ponycats (Carmila y Sandra :) ¡Por favor escríbanos que opinan y suscribanse a nuestro canal! :D


Estamos grabando un par de videos a la semana y tenemos todavía varios posts guardados. 
¡Que tengan bonito fin de semana!
Y a todas las mamás feliz día :)
-S

Monday, March 11, 2013


DIY: Buttons in your hair


One of my favorite things to do in the world is to go to one of those craft stores where they have a bucket full of buttons, sorting through it and selecting beautiful buttons. I can really spend a lot  time doing this : p
I have many buttons and I often don't know what to do with them. So I thought it was time to use some of them, and so i thought of this little tutorial, hope you like it (;

Una de mis cosas favoritas de hacer en el mundo es ir a una de esas mercerías en donde tienen una tina llena de botones (10 x 3 pesos), sumergir mi mano y buscar botones hermosos. Puedo pasar realmente mucho tiempo haciendo eso : p
Tengo muchos botones y muchas veces no se ni que hacer con ellos, así que pensé que sería bueno darles un uso a algunos y así que pensé en hacer este pequeño y sencillo tutorial, espero les guste(;

  Lo que necesitan:

*Botones
*pasadores
*pistola de silicón

Select any button you like and glue it to the bobby pin. Done!

Toman el botón y lo pegan al pasador. ¡y listo! Más fácil no se puede : p


I really hope you like this idea and that you have an awesome day!

Espero les guste esta idea y que tengan un hermoso día(:

- C

Monday, February 25, 2013


A hair tutorial inspired from these photographs
Un tutorial inspirado en estas fotografías

This may look to you as the most pointless hair tutorial in history -which it kind of is - because it is mostly a messy not very accurate hairstyle. But to be honest some people have asked my about the hair arrangements in my photo shoots before. Most of them are imperfect to say the least, and consist of braids, buns, some adornments and wavy hair. 
I don't own any hair appliances or know much about hair care, and if I were to start using perfect hair in my photos it probably wouldn't be the hair that's normally considered perfect. But hey, my idea of great hair is more Queen Amidala and less Kim Kardashian (or regular famous people), than most people's.

Here's the method to the madness in 4 easy steps :) I'm trying this new method, the drawing method:

Este tutorial es tal vez el tutorial menos útil en la historia, porque claramente es bastante desordenado y no tiene mucho sentido. Pero para ser sincera algunas personas me han preguntado por los peinados que hago en algunas de mis fotos. La mayoría son imperfectos y están hechos con chonguitos, trenzas y algunos adornos a veces y pelo ondulado. 
No tengo herramientas para peinar como secadoras y planchas y no se mucho de cuidados para el pelo, pero si empezara a usar peinados bien hechos en mis fotos probablemente no serían tan comunes porque en realidad mi idea de un buen peinado es más parecido a la reina Amidala y menos parecido a los peinados que veo normalmente que usan las personas famosas.

Aquí están las cortas instrucciones que esta vez intente hacer dibujadas :)


This is how the hair looks from the front. You can see the rest of the photographs here in my photography blog: Dig a Pony My model was of course Carmila and it was a short nice session. I've thought a little about doing a video of the make up tutorial for this look, but haven't quite gathered the courage to actually do it.
Así es como se ve el pelo por delante. Las demás fotos las pueden ver aquí, en mi blog de fotografía Dig a Pony . Mi modelo por supuesto fue Carmila y fue una sesión linda y corta. He estado pensando en hacer un video con el tutorial de el maquillaje que tiene en las fotos pero no he tenido el valor de grabarlo. 


And this is how it looks from the back.
Have a great week everyone :D
Y así es como se ve por atrás.
Que tengan una bonita semana :D
xoxo
-S

Friday, February 15, 2013


 Hair
:: Cabellos ::

Last week, one of the guys that I work with (in the shop) asked me if I could make a drawing on a book with drawings an illustrations by a few artists an illustrators (all from cuernavaca and df I guessed) so I agreed. And when I was about to start drawing I realized that I haven't drawn for almost 6 months or so. O_o And then I remembered how much I enjoy drawing hair, and drawing in general, just for fun, without having to explain myself to noone(:
El otro día uno de los chicos con los que trabajo, me pidio que interviniera un libro en donde varias personas han dibujado también. Le dije que si, y cuando me disponía a empezar me di cuenta de que no había dibujado en casi 6 meses... ( tal vez más). Recordé cuanto disfruto dibujar cabello y dibujar en general, sólo por diversión y sin tener que justificar lo que hago con nadie(:


 (sorry for the blurry pictures :p)

So I thought I could shared my drawing and a little part of my process(;
I encourage you to rediscover those things that inspire you, but that for some reason you stopped doing them.

Así que pensé que podría compartirles mi dibujo y un poco de mi proceso(;
Y los invito a que redescubran alguna cosa que los inspire, que disfrutaban hacer pero que por alguna razón dejaron de hacer. Los hará felices recordar(:

Have a beautiful day!
Que tengan un hermoso día(;

-C


Sunday, October 14, 2012


How I get ready every day:
Como me arreglo todos los días:

I have to admit that making this post makes me feel a little self conscious...and I also have a confession to make: I'm one of those people who don't ever go out without makeup, it is a little embarrasing to admit, but it's the truth. And the ironic thing is that I really know very little about makeup, that's why this is not a makeup tutorial, I'm just gonna show you what I do everyday to look (in my opinion) a little better when I leave the house(;

Tengo que admitir que hacer este post me hace sentir un poco insegura. También tengo que confesar una cosa: soy una de esas personas que no pueden salir de casa sin maquillaje, es un poco vergonzoso admitirlo, pero es la pura verdad. Y irónico del asunto es que realmente no se mucho (o casi nada) de maquillaje, es por eso que este no es un tutorial :p Y sólo les voy a mostrar lo hago todos los días para verme un poco mejor (en mi opinión) antes de salir de casa(;


This is how I style my hair almost every day, I usually put some hair styling cream, but today I clearly didn't :p

Así es como me peino ( si es que a eso se le puede llamar peinarse) casi todos los días, normalmente me pongo crema para peinar pero ese día no lo hice...claramente :p

 
My make-up routine is pretty simple and quick. I start by applying my liquid foundation, then I put on a little bit of blush (blush is essential for me, if I don't wear blush I look a little bit dead...). I fill in my eyebrows with a brown pencil covering any little gaps I have, and line my top lashline and define the bottom lashline a bit.
Then for the eyeshadows I begin by putting on a cream eyeshadow in a golden tone all over my lid, top it with the lightest color from my shadow quartet and finish by applying a little bit of the warm bronzy-brown color on the outer part of my lid. 

Realmente mi rutina de maquillaje es muy sencilla y ràpida. Me pongo base, después un poco de blush ( el blush es esencial para mi, sino me veo un poco muerta...) Rellleno con un lapiz café los huequitos de mis cejas. Luego empiezo poniendome un poco de sombra en crema en un tono dorado sobre el párpado, después aplico abajo de las cejas la sombra más clara del quad y termino aplicando un poco de la sombra cobriza. (esto es nuevo para mi, lo empecé a hacer hace muy poco porque pasé mucho tiempo sin pintarme nada los ojos)

I pop on some mascara and some lipstick, and I'm done!  
Me pongo máscara de pestañas y me pongo labial. ¡Y listo!

 The products that I use are very basic stuff, nothing too fancy either. The lipstick, eyeshadows and the brushes (which I love!) were a birthday gift from Sandra (: Before that, I used to wear a darker shade on my lips, a wine color, but now I wear the lip butter and it helps my lips stay hydrated, it has quickly become my new favorite.

Los productos que uso son muy básicos nada muy fancy. El labial, las brochitas (¡qué me encantan!) y las sombras, me las dio Sandra en mi cumpleaños(: Antes usaba un tono de labial mucho más oscuro, como vino, pero Sandra tmabién me regaló este que además es como hidratante y ha pasado a ser mi favorito sin duda.

 1.- Revlon Colorburst Lip Butter in Cherry Tart
2.-Labello, Frutty shine Pink Guava
3.- Maybelline gel cream eyeshadow - Eternal Gold
4.- Revlon colorstay eyeshadow - adventurous
5.- Cheap brown eyeliner - Delineador de mercado ja
6.- Natura eye brushes - Brochas para ojos de Natura
7.- Mary kay blush in Shy blush
8.- Mary kay liquid foundation in Ivory 5
Base liquida de Mary Kay en Ivory 5


Daily make up routine: Done!
Rutina de maquillaje diaria: ¡Lista!

I hope you have an awesome day!
Espero que tengan un precioso día(:

-C